How to update the manifest file in a JAR file
The JAR file is a aggregate file that combines various related Java class files and their associated meta data, text files, images, etc., into a single container so that its easy for deployment and distribution of software. For the sake of software packaging, maintenance and distribution, the JAR file supports different functionalities like version control, run-time resources permission control, code signing, etc. The entity that makes these possible is the MANIFEST.MF file. This file can be located by first extracting the contents of the JAR file using a standard Zip or 7Zip software. The MANIFEST.MF resides in the META-INF folder within the JAR file. it can be opened and inspected using any text editor program.
At times, we may need to update the contents of the MANIFEST.MF file in order to add/remove certain features of a JAR file. For example, one common use case could be to update the "Codebase", "Application-Name" or "Permissions" attributes in order to make the JAR file suitable for a Java Web Start (JWS) deployment. The latest security directive given by Oracle on JWS strongly recommends updating the above attributes to proper values for an acceptable JWS deployment.
Even though the MANIFEST.MF contents may be changed using a text editor, the JAR file's functionality will not get updated. We will have to use a special tool called a jar tool. So, lets get down to the steps of actually updating a given JAR file's MANIFEST.MF:
For our example, we wil use a JAR file called "NexawebClient.jar".
Step-by-step guide
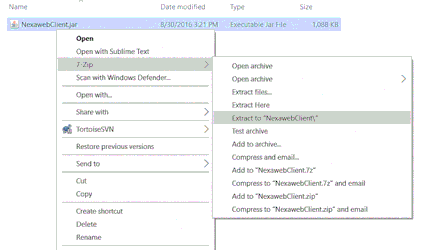
- The first step is to extract the JAR file.
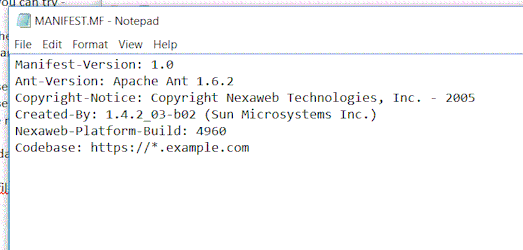
- Once all the files are extracted, locate the META-INF folder. Inside the folder you will find a file called "MANIFEST.MF"
- The below screen shows the content of the MANIFEST file. You can open the file with any standard text editor. In this example, lets update the file with "Application-Name" and "Permissions" attributes.
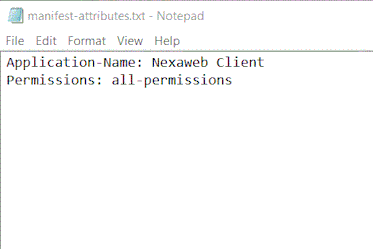
- Lets create a new text file "manifest-attributes.txt" with the following content - "Application-Name: Nexaweb Client" and "Permissions: all-permissions". The text file has to be created outside of the JAR file. Also, make sure that
you press carriage return after the last attribute that you specify in the text file - this is VERY IMPORTANT. This is shown in the screenshot below - - Now we need to transfer the contents of the "manifest-attributes.txt" text file to the MANIFEST.MF of the JAR file. For that we will use the jar tool in command prompt. First lets make sure that the text file and the JAR file are in the same directory. Open the command prompt and browse to this directory.
- In the command prompt, type in the following command: jar umf name-of-text-file.txt name of JAR file.jar
For our example, the command will look like this: jar umf manifest-attributes.txt NexawebClient.jar
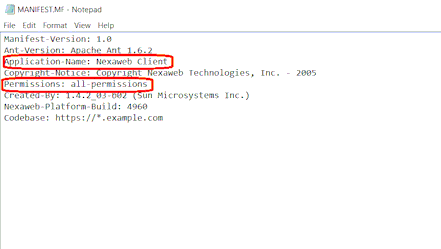
Then press enter. The prompt will return to a new line without any report as shown in the screenshot below - - Next, we will check the contents of the new MANIFEST file to see whether the updates took place. Repeat steps 1 and 2 to extract the contents of the JAR file and open the MANIFEST file. In our example, it got updated with the attributes we wanted.
- Now that we have confirmed the changes that we wanted, we can go ahead and use the JAR file in our application deployment.
For more information about manifest files, look up: https://docs.oracle.com/javase/tutorial/deployment/jar/manifestindex.html
Related articles


