...
In this example, the following Quick Test Pro locator methods locate the Quick Test Pro JavaObject wrapper for the label object named, Some Label:
| Method | Description |
| Browser | QTP method to look up a Browser object from within the QTP Object repository. |
| Page | Method on Browser Object used to lookup a specified Page object. The Page object must exist in the Object Repository. |
| JavaApplet | Method on the Page object for looking up an Applet object. The Applet object must exist in the Object Repository. |
| JavaObject | Method on the Applet object for looking up a JavaObject wrapper. The JavaObject wrapper must exist in the Object Repository. |
Once the script locates the QTP wrapper object for the Nexaweb component, it uses the Object propery to access the actual component. It then calls the getScriptObject() method on the actual component. The getScriptObject() method returns the Test Script Object for that object. The script can store the returned Test Script Object in a variable for later use in the test script.
| Tip | ||
|---|---|---|
| ||
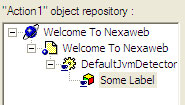
Quck Test Pro uses an object repository for storing the objects it uses to build its scripts. To access the Object Repository, select the "Tools/Object Repository...". For example, the object heirarchy of the Object Repository for the previous example would look as follows:
|
The find object methods of the Application Script Object
One drawback to using the getScriptObject() method is that you must add the UI components you want to test to the QTP Object Repository. While QTP provides a means for sharing Object Repositories between tests, the overhead of maintaining the Object Repository while you are developing the application may prove costly. As an alternaitve, the Application Script Object provides a set of find object methods for locating objects within the application. With this approach, you need to add only the Java applet to the Object Repository.
| Method | Description |
| findObjectById( String id ) | Returns the Test Script object for the UI component with the specified ID. |
| findObject( String expression ) | Returns the Test Script object for the UI component that matches the XPath expression. |
| findObject( Object baseObject, String expression ) | Returns the Test Script object for the UI component that matches the XPath expression that is a child of the baseObject. The expression must be relative to the baseObject. |
| findObjects( String expression ) | Returns a vector of all the Test Script object for the UI components that match the XPath expression. |
| findObjects( Object baseObject, String expression ) | Returns a vector of all the Test Script objects for the UI components that match the XPath expression that are children of the baseObject. The expression must be relative to the baseObject. |
To use the find object method, you must first get the script object for the application object similar to the following:
...
The following table describes the ListBoxScriptObject methods for selecting items:
| Method | Description |
| selectItemAt( int index ) | Selects the list item at the specified locatiion within the listbox. |
| selectItem( Object listItem ) | Selects the list item that matches the list item passed to the method. |
| selectText( Object text ) | Selects the list item with the text matching the passed in text. |
| selectValue( Object value ) | Selects the list item with the value matching the passed in value. |
The following is a sample test script for selecting the items of the listbox. The script first gets the number of items in the listbox, then loops through selecting each item.
...
The following table describes the ListBoxScriptObject methods for retrieving the contents of the listbox.
| Method | Description |
| getListItems() | Returns a vector of the list items that make up the listbox. |
| getListItemAt( int index ) | Returns the list item at the specified location. |
| getTextAt( int index ) | Returns the text of the list item at the specified location within the listbox. |
| getValueAt( int index ) | Returns the value of the list item at the specified location within the listbox. |
The following test script gets the text and value of each list item. It first gets a vector containing all the list items of the listbox. It then gets each list item from the vector retrieving the text and value of each list item.
| Code Block |
|---|
Set listitems = listBox.getListItems() For i = 0 to listitems.size() - 1 Set li = listitems.valueAt( i ) text = li.getText() val = li.getValue() Next |
...
As with the listbox, most of the testing on the combobox includes verifying the contents and selecting the items of the combobox. The following table describes the ComboBoxScriptObject methods for selecting and verifying the combobox:
| Method | Description |
| getItems() | Returns a vector of the items that can be selected within the combobox. |
| selectItemAt( int index ) | Selects the item at the specified location within the contents of the combobox. |
| selectItem( Object item ) | Selects the item that matches the specified item within the contentes of the combobox. |
The contents of the combobox are contained in either a listbox, tree, treetable, or table subcomponent. The returned or selected items are actually contents of the particular subcomponent.
...
The MCO sets the text of the label to the value of the combobox's onCommand() event.
The QTP Test Script
The test first verifies the initial state of the combobox and the label. It then selects each item of the combobox. After each selection, it tests the text of the combobox against the text of the item being selected. It also tests the text of the label against the value of the item being selected.
Since you can make the combobox an editable component, the ComboBoxScriptObject exposes methods for testing this.
The following table describes the ComboBoxScriptObject methods for testing an editable combobox.
| Method | Description |
| isEditable() | Returns whether or not the combobox is editable. |
| enterText( String text ) | Enters the test into the combobox by simulating typing the characters of the passed string. |
| getMaxLength() | Returns the maximum number of characters than can be entered into a combobox. |
The following test script demonstrates entering text into an editable combobox.
...
The MCO sets the text of the label to the value of the combobox's onCommand() event.
The QTP Test Script
The test script first double clicks the combobox to select the text in the textfield. Next, it enters the new text and fires the enter key to end editing and fires the onCommand() of the combobox. The test ends by checking the text in the label to ensure that it was set to the value entered into the combobox.
Testing the Tree
Testing the tree is similar to testing the listbox; however, verying the contents and selecting items is more complex, since each row of the tree can have sub-rows.
The following table describes the TreeScriptObject methods for selecting and getting the items (these methods work with the top level rows only):
| Method | Description |
| getRowCount() | Returns the number of rows in the tree. |
| getRowAt( int index ) | Returns the row at the specified location within the tree. |
| selectRowAt( int index ) | Selects the row at the specified location wihin the tree. |
| expandRowAt( int index ) | Expands the row at the specified location within the tree. The row must have sub-rows and not already expanded. |
| collapseRowAt( int index ) | Collapses the row at the specified location wiithin the tree. The row must have sub-rows and be expanded. |
You can access sub-items that make up the tree by working with the rows. Each row may have content, the objects that make up the row, as well as child rows. For example, in the following tree, the first row has two objects "Multi Item Row Item 1" and "Multi Item Row Item 2" and two child rows.
...
The following table describes RowScriptObject methods for retrieving contents and sub-items of the row:
| Method | Description |
| getObjectCount() | Returns the number of objects in the row. |
| getObjectAt( int index ) | Returns the object at the specified location. |
| getObjects() | Returns a vector containg all the objects that make up the content of the row. |
| getChildCount() | Returns the number of child rows. |
| getChildAt( int index ) | Returns the child row at the specified location. |
| getChildren() | Returns a vector containg all the child rows the current row. |
The following example selects a sub row of the tree, two levels down:
...
The following table describes the TableScriptObject methods that work with the first object of each row; use these for working with trees that have only one item per row:
| Method | Description |
| getItemCount() | Returns the number of items in the tree. |
| getItems() | Returns a vector of the items of the tree. |
| getItemAt( int index ) | Returns the item at the specified location. |
The following example tests the items of a simple tree:
...
For each item, the script gets the text and value, selects the item, then compares the text and value against the text and value of the selected item.
Testing the Table
The most common table test scenarios include getting and setting values of cells.
...
| Code Block | ||||
|---|---|---|---|---|
| ||||
 <nxml>
  <rootPane>
    <table id="EditTable" selectionMode="singleCell">
      <column>
        <header text="Column #1"/>
      </column>
      <column>
        <header text="Column #2"/>
      </column>
      <row>
        <cell text="Tree Item 1"/>
        <cell text="editable cell" editable="true"/>
      </row>
      <row>
        <cell text="Sub Tree Item 1"/>
        <cell text="Sub Tree Item 1"/>
      </row>
      <row>
        <cell text="Sub Tree Item 2"/>
        <cell text="Sub Tree Item 2"/>
      </row>
      <row>
        <cell text="Tree Item 2"/>
        <cell text="Tree Item 2"/>
      </row>
    </table>
  </rootPane>
</nxml> |
The QTP Test Script
Advanced Testing
The Test Script API also provides mechanisms for testing more advanced scenarios such as working with right mouse context menus, dialogs, tooltips and even drag and drop. This section provides examples of how to use the Test Script API to test some the more advanced scenarios.
...
| Code Block | ||||
|---|---|---|---|---|
| ||||
import com.nexaweb.client.mco.AbstractMco;
import com.nexaweb.xml.Element;

public class MenuTestMCO extends AbstractMco
{
     public void handleMenuCommand( Element textField, String newValue)
     {
          textField.setAttribute("text", newValue);
     }

     public void handleCBStateChange( Element checkBoxItem,
           Element textField )
     {
          String check = checkBoxItem.getAttribute( "selected" );
          if( check == null )
          {
               check = "false";
          }
          textField.setAttribute( "text",
             "CheckBox MenuItem State " + check );
     }
} |
The QTP Script
The following example demonstrates how to use the menus as defined in the XML UI to test the runtime menus. This test is built against the same XML UI and MCO from the first menu example.
The QTP Script
Testing Context Menus
Context menus are the popup menus that are hooked to the right mouse of a UI component. The following example demonstrates testing a popup menu that is brought up as a right mouse context menu of a label.
...
| Code Block | ||||
|---|---|---|---|---|
| ||||
import com.nexaweb.client.mco.AbstractMco;
import com.nexaweb.xml.Element;

public class ContextMenuHandler extends AbstractMco
{
     public void handleMenuCommand( Element textField, String newValue)
     {
          textField.setAttribute("text", newValue);
     }
} |
The QTP Script
Testing Tooltips
You can define tooltips for components either as a simple text string or as a predefined popup (for example, a panel consisting of four labels). You can retrieve the tooltip using the getTooltip() method of the ApplicationScriptObject. This method returns a PopupScriptObject, a panel for containing the objects that make up the tooltip. The PopupScriptObject has the following methods that make it easier to work with basic text tooltips:
| Method | Description |
| isTextTooltip() | Returns whether or not the popup is a simple text tooltip. |
| getTooltipText() | Returns the text of a simple text toolitp. Returns a null if the tooltip is not a simple text tooltip. |
The following example demonstrates testing tooltips.
...
To test a window, you need to be able to work with the title bar and the contents that make up the window. The following WindowScriptObject methods allow access to the title bar as well as the maximize, minimize and close buttons:
| Method | Description |
| getTitle() | Returns text of the titlebar for the window. |
| getTitleBarBackgroundColor() | Returns the background color of the titlebar for the window. |
| getTitleBarFontColor() | Returns the color of the font used to draw the text in the titlebar of the window. |
| maximizeWindow() | Maximizes the window. |
| minimizeWindow() | Minimizes the window. |
| restoreWindow() | Restores the window from its minimized or maximized state. |
| closeWindow() | Closes the window. |
To work with the conents of the window, use the getContentPanel() method to obtain the PanelScriptObject,the top level container for the objects that make up the window. Once you obtain the content panel, you can retrieve specific UI components using either the findObject() method of the ApplicationScriptObject, or the getChildObject() methods of the PanelScriptObject.
...
| Code Block | ||||
|---|---|---|---|---|
| ||||
import com.nexaweb.client.mco.AbstractMco;
import com.nexaweb.xml.Document;
import com.nexaweb.xml.Element;

public class WindowTestHandler extends AbstractMco
{
    public void buttonOnCommand( Element label, String value )
    {
        Document document = getSession().getDocumentRegistry().
             getUiDocument();
        synchronized ( document.getDomSynchronizationObject())
        {
            label.setAttribute( "text", value );
        }
    }
} |
The QTP Test Script
Testing Dialogs
A dialog is a special window that by default does not have a maximize or minimize button and that you can set to be modal. A modal dialog does not release the input focus while it is open.
...
| Code Block | ||||
|---|---|---|---|---|
| ||||
<nxml>
  <declarations xmlns="http://nexaweb.com/mco">
    <mco id="dialogHandler" src="DialogTestHandler"/>
  </declarations>
  <rootPane id="rootPane">
    <button id="button" text="add dialog"
          onCommand="mco://dialogHandler.addDialog(rootPane)"/>
  </rootPane>
</nxml> |
The MCO
The QTP Test Script
A message dialog is a special dialog used to display a message with icons and buttons.
...
The test will first get the message dialog then test the message and the buttons. Finally closing the dialog by clicking the OK button.
Testing Tab Panes
A tab pane is a component that allows other components to share the same space. The tabs control the visible content. The visible component is the one associated with the selected tab. Although any component may be associated with a tab, typically a panel is the component associated with it. The following table describes the TabPaneScriptObject methods for accessing the tabs:
| Method | Description |
| getTabCount() | Returns the number of tabs in the tab pane. |
| getTabs() | Returns a vector of all the tabs in the tab pane. |
| getTab( int index ) | Returns the tab as the specified location. |
| selectTab( int index ) | Selects the tab at the specified index. |
| getSelectedTab() | Returns the selected tab. |
The following table describes the TabScriptObject methods for accessing the contents of the tabs (the tab consists of the text that is displayed in the tab, as well as a view, which is the component that is associated with the tab):
| Method | Description |
| getText() | Returns the text displayed for this tab. |
| getView() | Returns the component being displayed for this tab. Typically this component is a panel, however it could be any component, such as a label or a text field. |
The following example demonstrates how to build a test to verify a tab pane. The test verifies the tab count and the text of the tabs. The test then selects the second and third tabs and verifies the content of the two tabs.
...
| Code Block | ||||
|---|---|---|---|---|
| ||||
 <nxml>
 <rootPane>
  <tabPane height="200" width="400">
   <tab text="Tab 1">
    <label text="first tab"/>
   </tab>
   <tab text="Tab 2">
    <panel>
     <label text="Tab 2 Child 1"/>
     <label text="Tab 2 Child 2"/>
     <label text="Tab 2 Child 3"/>
     <label text="Tab 2 Child 4"/>
     <label text="Tab 2 Child 5"/>
    </panel>
   </tab>
   <tab text="Tab 3">
    <label text="third tab"/>
   </tab>
  </tabPane>
 </rootPane>
</nxml> |
The Test Script
Testing Button Groups
A button group is a group of radiobuttons or checkboxes. Only one checkbox or radiobutton may be selected within the group.
...
| Code Block | ||||
|---|---|---|---|---|
| ||||
<nxml>
  <rootPane>
    <panel borderWidth="1">
      <flowLayout orientation="vertical"/>
      <radioButton text="Radio 1" group="group1" selected="true"/>
      <radioButton text="Radio 2" group="group1" selected="false"/>
      <radioButton text="Radio 3" group="group1" selected="false"/>
      <radioButton text="Radio 4" group="group1" selected="false"/>
    </panel>
  </rootPane>
</nxml> |
The Test Script
Testing Footer Rows
A footer row is a special row that is always drawn on screen at the bottom of a table, tree, or tree table in any vertical scroll position. A user cannot select this row, navigate to it with the keyboard, expand it, edit or otherwise interact with it; it is for display purposes only. It is commonly used, for example, to display summation data for the table as a whole.
...
This test script gets the footer row and checks the value of the two lables contained by the footer row.
...
| Tip | ||
|---|---|---|
| ||
Prior to Nexaweb Platform 4.5.7, the <ui-test> flag in nexaweb-client.xml has to be true in order to use test script classes. In 4.5.7 and later versions, these classes are accessible via a plug-in jar file and can be used with this flag being true or false. If it is set to false, obfuscated Nexaweb client jars will be used and the JavaObject object in QTP will get a name that is not the client class name. Please see 4.5.7 release notes for more information. |

...